Table des Matières
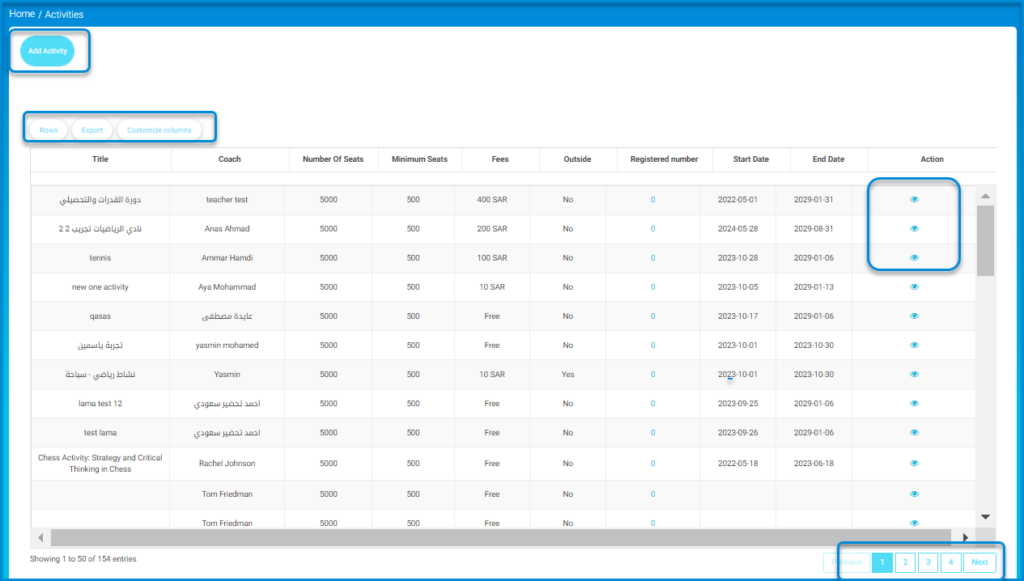
The following steps will guide you to interact with the Summer Clubs screen, manage, and view activities.

- Click the Add Activity button to create and add a new activity to the list.
- Use the Rows button to adjust the number of rows displayed on the table.
- Click the Export button to export the activity list data.
- Use the Customize columns button to adjust which columns are displayed in the table.
- The table shows various columns such as Title, Coach, Number of Seats, Minimum Seats, Fees, Registered Number, Start Date, and End Date.
- You can view or manage activities by clicking the eye icon under Action.
- Use the pagination at the bottom to navigate through different pages of activities.
Adding Activity #

The following steps guide you through the process of adding a new activity, including filling in essential details and attaching relevant files.
- Enter the name of the activity in the corresponding field.
- Select the type of activity from the Activity Type dropdown menu.
- Choose the coach responsible for the activity from the Coach drop-down menu.
- Select the start date of the activity using the date picker, or click Clear to reset the field.
- Select the end date of the activity using the date picker, or click Clear to reset the field.
- Choose the area related to the activity from the Activity Area drop-down menu.
- Provide a detailed description of the activity in the text editor.
- Select the time for the activity from the Choose Time drop-down.
- Select the relevant school and grade levels for the activity from the School/Grade Levels drop-down menu.
- Specify the fees for the activity, if applicable, in the Fees field using the up and down arrows at the right side of the field.
- Check the Mail in the activity box if mailing is required for the activity.
- Enter any prerequisites for participating in the activity in the text editor.
- Input any specific requirements for the activity in the text editor.
- Upload a cover image or additional files by clicking Choose File or dragging a file into the attachment area.
- Once all fields are filled out, click Save to add the activity.


